
Direct answer for buyers
Designing a Mahjong set starts with defining the collection scope, then choosing a design direction, preparing production-safe artwork, and checking every component at sample stage before bulk production begins.
Buyers get better results when they treat tile faces, backs, jokers, mats, racks, carrying cases, and packaging as one coordinated product system instead of separate design tasks.
Key takeaways
- Designing a Mahjong set starts with defining the collection scope, then choosing a design direction, preparing production-safe artwork, and checking every component at sample stage before bulk production begins.
- Buyers get better results when they treat tile faces, backs, jokers, mats, racks, carrying cases, and packaging as one coordinated product system instead of separate design tasks.
- Before opening a design tool, decide what the collection includes.
On this page
- Step 1: Define Your Collection Scope
- Step 2: Choose a Design Direction
- Step 3: Prepare Tile Face Artwork
- Step 4: Design the Tile Back and Jokers
- Step 5: Plan the Mat and Packaging
- Step 6: Submit Files for Review
- Step 7: Approve Samples Before Production
- Step 8: Plan the Launch
- Common Buyer Questions
- Recommended CTA Block
- Buyer checklist
- Production notes
- Related buyer guides
Step 1: Define Your Collection Scope
Before opening a design tool, decide what the collection includes. That scope changes artwork needs, sample planning, MOQ conversations, and packaging decisions.
| Collection element | What to define first |
|---|---|
| Tile set | Whether the project uses a 152, 160, or 166-tile configuration and whether blanks or extra jokers are needed. |
| Tile size and material | Standard or thicker tile feel, plus acrylic, melamine, or layered acrylic direction. |
| Tile backs and jokers | Color story, logo placement, themed artwork, and how much detail can remain readable at tile scale. |
| Accessories | Racks, pushers, dice, mats, carrying case, pouch, or gift box requirements. |
| Packaging | Retail box, insert card, sleeve, label, barcode area, and carton mark needs. |
Step 2: Choose a Design Direction
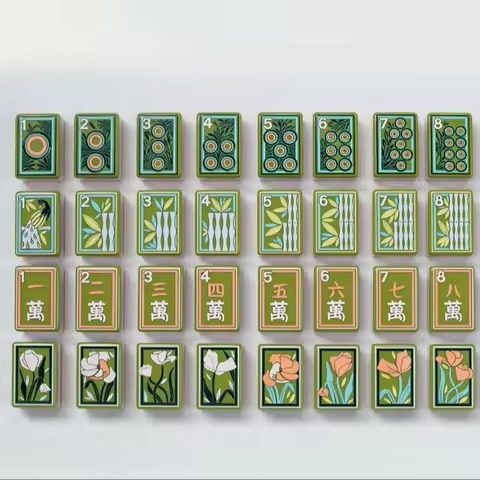
Strong Mahjong collections usually become easier to execute when the creative direction is clear early. Common directions include botanical and floral, bold and modern, classic and timeless, pastel and playful, and seasonal or event-led themes.
The goal is not only to make the tiles attractive. The direction should also help decide color matching, engraving style, mat artwork, packaging, and how the set photographs online.
Step 3: Prepare Tile Face Artwork
Tile faces must stay readable during actual play. Clean lines, large numerals, clear suit symbols, and controlled color usage matter more than decorative complexity.
- Use bold lines because thin strokes disappear at tile scale.
- Keep numerals large and centered for fast recognition.
- Limit colors when engraving and color fill are involved.
- Test every face at real tile size before approval.
- Use vector artwork such as AI, PDF, or SVG whenever possible.
Tile faces should support play first and decoration second. Artwork that looks impressive on a large screen can fail once it is reduced to a small acrylic or melamine face.
Step 4: Design the Tile Back and Jokers
Tile backs are often the most photographed part of the set and carry a large share of the brand identity. Many buyers use solid colors with logos, pattern repeats, full-bleed artwork, or layered acrylic combinations for a stronger premium look.
Jokers are where buyers often add the most personality. Brand mascots, flowers, monograms, seasonal icons, and collaborative illustrations can work well if the silhouette remains clear when reduced to tile size.
Step 5: Plan the Mat and Packaging
A Mahjong mat is the largest printable surface in the collection, so it can carry border graphics, event branding, teaching layouts, or repeat patterns that would be too dense for tile faces. Packaging then becomes the first physical brand impression the buyer or gift recipient sees.
For packaging, plan the box structure, insert cards, sleeve or belly band, barcode area, and shipping marks at the same time. Buyers should not wait until the end of production to decide how the collection is presented.
Step 6: Submit Files for Review
Once the concept is ready, send the manufacturer:
- Vector artwork for tiles, jokers, packaging, and other printed components
- Color references such as Pantone, CMYK, or hex values
- Font information or outlined text
- A mood board or reference images
- A scope document covering quantity, destination, materials, and launch timing
The design review should confirm readability, material fit, color consistency across acrylic, textile, and paperboard, and whether the file preparation matches the production method.
Step 7: Approve Samples Before Production
Sample approval is the checkpoint that protects the entire launch. Buyers should check tile face clarity, back alignment, joker rendering, mat print quality, packaging fit, and accessory color consistency before approving bulk production.
This is also the stage to catch practical issues such as details that disappear at scale or packaging choices that do not match the intended retail positioning.
Step 8: Plan the Launch
When production timing is confirmed, start preparing product photography, social content, wholesale presentation materials, and the story behind the collection. Good launch preparation makes the design work easier to monetize once inventory arrives.
Common Buyer Questions
Can I design my own Mahjong set without design experience?
Yes. Buyers can start with mood boards, reference images, hand sketches, logos, and Canva drafts. The manufacturer can then adapt those references into production-ready files.
What files do I need to design a custom Mahjong set?
Editable vector artwork in AI, PDF, or SVG format is preferred. If you do not have final vectors yet, logos, brand colors, sketches, and layout notes are still useful starting inputs.
Can the same artwork be used on tiles, mats, and packaging?
The same brand direction can be used across the collection, but each surface normally needs its own production adaptation because the sizes, materials, and print methods are different.
Recommended CTA Block
Design-led buyers usually need three clear next steps:
- Discuss a Custom Mahjong Project when the concept, mood board, or artwork direction is ready.
- Request a Wholesale Quote once quantity, destination, and product scope are defined.
- Get the Product Catalog if you want to compare starting formats before deeper customization.
Send your mood board, logo, target quantity, and product scope. Lucky Mahjong can review the design direction and map the next sample and quotation steps.
Request a Wholesale QuoteRelated references: Custom American Mahjong Sets, American Mahjong Design Service, Custom Mahjong Artwork Files, and Custom Mahjong Design to Delivery Timeline.
Buyer checklist
- Check ownership and licenses for artwork, fonts and reference images.
- Confirm face, back and joker files against the tile manifest.
- Approve a physical proof for scale, legibility and color before bulk production.
Production notes
Artwork guidance is a preparation aid. Minimum line widths, color matching and marking methods depend on the material and approved sample.
Continue your project planning
Use this guide to prepare your brief for Custom Mahjong tiles.
Planning a custom set?
Send quantity, tile count, target dimensions, artwork status, accessories, packaging, destination and launch date. These details help define a comparable quotation and sample scope.
Discuss a custom project